Floating Dock Attachment Bracket - doesn't fit?
At Grandview Waterfront Products, I have assembled many Wave Armor floating dock attachment brackets and believe me, they can be a frustrating experience. Especially, getting the bolt for the upper bracket to engage in the threaded insert, for the lower bracket! Here are a couple of tricks to make the process easier:
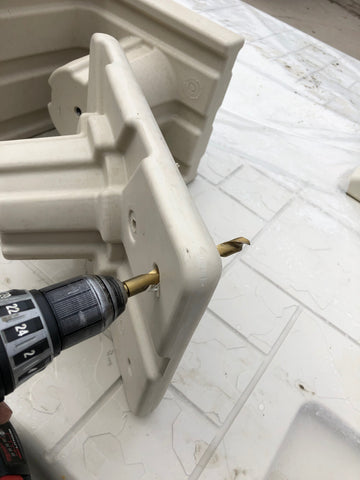
#1 - with a drill that is a smaller diameter than the id of the threaded insert, drill out the plastic bottom.
 #2 - with a larger diameter diameter drill, 1/2" or slightly less, drill out the upper bracket bolt location hole to give the locating bolt as much leeway as possible.

#3 - with the same drill bit, hollow out at an angle, the top dual bolt hole openings.
#4 - insert bottom bracket into port, insert top bracket into port and insert washers, lock washers and bolts into top bracket outboard holes and initiate threads. Do not tighten, the top bracket needs movement to be able to align with the bottom bracket bolt hole.

#5 - substitute a 3" long stainless steel bolt in place of the supplied 2" bolt. This will give you enough length to engage the threaded insert of the bottom bracket. You need to peek in first, line up the holes and then drop in the washer, lock washer and bolt combination. Use a long screw driver to coax the bolt into the hole.


#6 - with a socket extension, hand twist the bolt so that it engages with the threaded insert properly and then tighten up to pull the top and bottom bracket together.


#7 - now tighten the outer bracket bolts. Front and rear floating dock attachment brackets should then look like this.


Feel free to contact us if you have comments or questions.
- Richard Hatkoski
Comments 0